Showing posts with label linux. Show all posts

mongo db startup init.d script on CentOS/Redhat

Here we are going to create init script for mongodb, so that mongodb can start at the time of boot. So follow below steps to configure mongodb startup script.


(1) Create a file /etc/init.d/mongodb with below content. You may need to change path of mongod. In below script the path is "/opt/mongo/bin/mongod". But you need to change according to your installation of mongodb. Also you may need to change "mongodb_user". This will run mongo db as specified user.
(2) Now make it executable using below command.

chmod a+x /etc/init.d/mongodb

(3) Now you need to make it runable in runlevel 3,4 & 5. So use below command.

chkconfig --level 345 mongodb on

chkconfig --list mongodb

You can see mongodb service is configured to run at runlevel 3 4 & 5.

(4) Once you are done with all above 3 steps, you can start & stop mongodb service.
Note: please make sure to kill the currently running mongodb process. 

Skype Audio Sound issue in Ubuntu 13.10

I am trying to remove total dependency on Windows 7 by using Open Source Ubuntu 13.10. Ubuntu 13.10 (Saucy Salamander) seems quite stable. Except two issue I faced recently with Skype audio problem and Vmware Player(incompatible with kernel 3.1x).

To solve Skype audio issue, below command was helpful.

Installing VMware Player on Ubuntu 13.10

I mostly choose Vmware Player as virtualization platform. There is one more Virtualization tool available "VitualBox". I have used "VirtualBox" also, but due to lack of networking options I do not prefer to use "VirtualBox".

Vmware Player provides good options for networking like Bridge network, host only and Natted. I prefer to use Natted, as all Guest OS can communicate with each other, with Host OS and with Internet too.

When I started installation of VMware Player in Ubuntu 13.10, I got some errors. When I checked "dmesg" I found that there was segmentation fault error with one of the library file.

I searched on Internet, and then I found that the problem was not with any library file but with the Kernel.

Ubuntu 13.04 is having kernel 3.11.0-12-generic, while VMware do not support this kernel version. So finally searching from some of the forum I found below steps to overcome issue of VMware Player installation on Ubuntu 13.10.

First you need to download VMware player for Ubuntu from Vmware website. I got "VMware-Player-5.0.2-1031769.x86_64.bundle" for me.

Now before we start installation, we need to install prerequisites. Use below command.

Then install Vmware Player using below command.

You will see progress of installation, and it will finish. But when you start Vmware Player, it will ask to install some modules. When you click on "Install" button, it will show you "Send Crash Report".

Now follow below steps to solve your issue.

Once done, you can start VMware Player without any issue.

Hope this will help, who wants to run VMware Player in Ubuntu 13.10.

Linux Terminal Shortcuts

Writing long commands every time becomes tedious and time consuming too. Here I am going to list down some shortcuts which will help you to save time while using Linux terminal.

Ctrl+left & Ctrl+right

Hitting Ctrl and the left or right arrow keys jumps between arguments in your command. So, if you had a typo in the middle of the command, you could jump to it quickly with Ctrl and a few taps of the left arrow key.

Tab

This shortcut key is often used. When using bash you need to just type few characters and then pressing tab will auto complete command or file/directory name.

Ctrl + U or Ctrl + C
This shortcut will clear command written on shell.

Ctrl + R
This command also most often used. When you hit Ctrl plus R it will open up history, as you type character it will display all previous command matches with character you typed.

If you want to go through all command one by one which matches with the character you entered then press Ctrl + Shift + R.

Alt + BackSpace

This shortcut will remove the word from its current position.

!
This shortcut also used to repeat previous command. Instead of pressing Ctrl + R, you can type ! then characters to repeat from history.

You can see in below image. If I want to run "pkill skype", I have written "!pk" and the hit enter. This will run "pkill skype" command.


Installing Apache Ant on linux / CentOS / Red Hat

Prerequisites:
- Make sure you have installed JAVA . If not then click here to install java.

Steps:
1. First download Ant binary packages from Apache. You may use below link to download Apache Ant.
http://apache.mirrors.tds.net//ant/binaries/apache-ant-1.9.2-bin.tar.gz

2. Keep downloaded binary file at some location. For example: /opt/apache-ant-1.9.2-bin.tar.gz.
3. Now go to /opt directory and extract zip file using below command.
cd /opt/
tar -zxvf apache-ant-1.9.2-bin.tar.gz
4. When you extract zip file it will create /opt/apache-ant-1.9.2 folder. Now we need to set ANT_HOME variable.
so open /etc/profile file and at the end of file write below lines and save it.

export ANT_HOME=/opt/apache-ant-1.9.2
export PATH=$PATH:$ANT_HOME/bin

Once you are done with /etc/profile file editing, you need to run below command to set variable's value.

source /etc/profile

5. Once you are done with above command, you can check ANT_HOME variable value with echo command.
for example:

-bash-3.2$ echo $ANT_HOME
/opt/apache-ant-1.9.2

Done.

RAID 5 Configuration on CentOS using mdadm

Why RAID?
RAID stands for Redundant Array of Inexpensive Disks or Redundant Array of Independent Disks. In RAID we join two or more harddisks and make one logical disk. Which gives below mentioned benefits. 

  • Stopping data loss, when one or more disks of the array fail.
  • Getting faster data transfers.
  • Getting the ability to change disks while the system keeps running.
  • Joining several disks to get more storage capacity; sometimes lots of cheap disks are used, rather than a more expensive one.
There are different RAID level, which we can make use of based on our requirement. I am not going into deep on level, but one of the most popular RAID level that is "RAID 5", I am going to show you here through example on CentOS.

Why RAID 5?
RAID 5 uses "striping with distributed parity" algorithm. In which each block on data will be stored in three different places. Ofcourse, RAID 5 needs atleast 3 disks. When any write request comes, it stores block on 2 disks(disk A and disk B) and on third disk(disk C) it will write parity information. On the next write request, it will store block on another 2 disk (disk B and disk C) and on third disk C it will store parity information. Like this, it continues writing parity and data blocks on all three disk. Due to parity information on each disk, we will get lesser storage space as 1/3 space will be used for parity.  
In case if any disk fails, RAID 5 will not stop. It will keep working in "downgraded mode". You will feel slow performance. Once you add another disk into RAID 5 array, it will start building array and after sometime, RAID 5 will act as usual. 

Steps to configure RAID 5 on CentOS
Prerequisites:
Additional 3 disks for RAID 5
mdadm-2.6.9-3.el5 package installed

1. Lets see how many disks are installed using "fdisk -l" command.

fdisk -l
fdisk -l
You can see here /dev/sdb, /dev/sdc and /dev/sdd is unpartitioned. We need to create partition so that it can be used in RAID 5.
2. using "fdisk" command we can create partition. So first we will create partition for /dev/sdb disk. Give command as shown below.
fdisk /dev/sdb
fdisk /dev/sdb
Once you give "fdisk /dev/sdb" command, you need to press "n", then press "p" and then press "1' for partition number. You can check partition using "p".
Print Partition using p
print partition using "p"
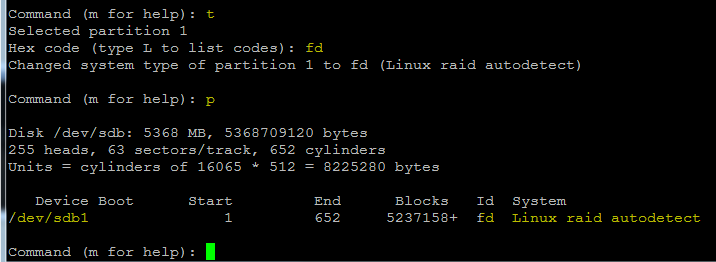
Now we need to change "ID" from "83" to "fd". Please see below image and follow steps. 
Change partition type
Now you can see partition "ID" is changed from "83" to "fd". Now we need to save changes, so press "w" as shown in below image.
save partition using w
Save partition
Now once again you can see partition status using "fdisk -l" command. You will see output as below.
show partition information
fdisk -l
you can see here /dev/sdb partition is created with "ID" as "fd".

3. Follow step #2 for /dev/sdc and /dev/sdd. Once you will create partition for all 3 disks, you will see below output.
Show partition information
4. Now we need to use "mdadm" command to create RAID 5 array. The command it self is self explanatory.
mdadm create partition
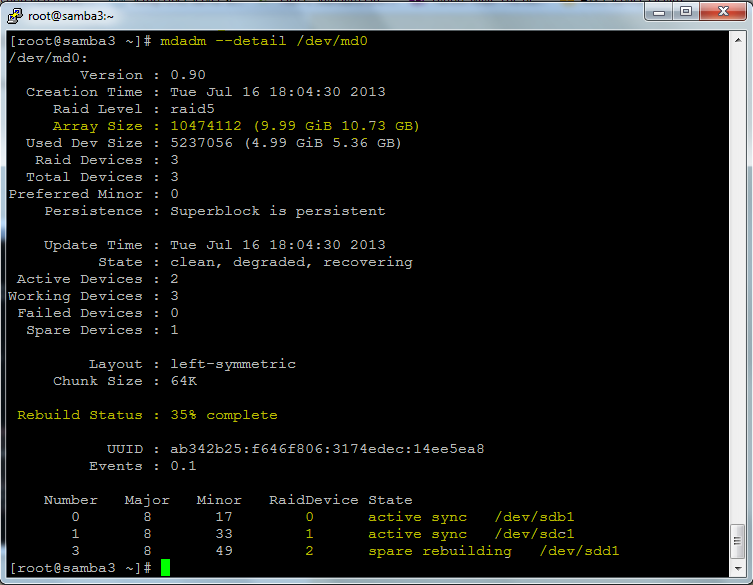
5. Once you create partition using mdadm command, it doesn't create RAID partition instantly, it takes time. you can see status using "mdadm --detail /dev/md0" command as shown below.
mdadm show details
mdadm show details
You can notice here "spare rebuilding" for /dev/sdd1. After some time you will see "active sync" for /dev/sdd1.
mdadm show details
mdadm show details
6. Now we need to format /dev/md0 RAID partition using mkfs.ext3. You can choose the partition type you want. Once format is done, you can mount it in /etc/fstab.

Format Partition
Format Partition
I hope this post will be helpful to configure RAID 5 in your server. 

Apache Load Balancer Configuration using mod_jk

Why Apache Load Balancer

We can use Apache Load Balancer module (mod_jk) to optimizes resource use, maximizes throughput, minimizes response time, and avoids overload as well as for auto failover.

How it can be utilized

Lets assume that you have two tomcat web applications running on two different servers. Now you want to make your application highly available and also want to distribute traffic across both tomcat application servers. So here we can configure one web server(apache) with mod_jk module, which will be act as a frontend server and two tomcat application servers will act as backend server.

Client request for your application will come to Web server(apache). Based on mod_jk configuration, apache will send request to both tomcat applications. Cool!!!!

How to configure mod_jk on Apache Web server.

1. First download mod_jk source from below mentioned link. Please choose package according to your server architecture(32bit or x64).
For Linux:
http://apache.petsads.us//tomcat/tomcat-connectors/jk/tomcat-connectors-1.2.37-src.tar.gz
For Windows:
http://apache.petsads.us//tomcat/tomcat-connectors/jk/binaries/windows/
2. If you are using windows then you need to simply copy mod_jk.so file into your apache's module directory.
If you are using linux then you will have to make mod_jk.so file using below steps.
1.1 Extract tomcat-connectors-1.2.37-src.tar.gz.
"tar -zxvf tomcat-connectors-1.2.37-src.tar.gz"
1.2 Now configure it using below command.
"./configure --with-apxs=/usr/sbin/apxs"
1.3 Now run make and then make install.
"make && make install"
Note: If you are getting any error, then please check if "httpd-devel" package is installed or not.
1.4 If above 3 commands run successfully, then it would have created mod_jk.so file into /etc/httpd/modules/ directory.

3. Now Load that module in apache's httpd.conf file using below string. You can copy that string at bottom of httpd.conf file.
#
# Load mod_jk
#
LoadModule jk_module modules/mod_jk.so

4. Now you need to specify workers.properties file path in httpd.conf file, so that apache can read configuration of both tomcat applications.

JkWorkersFile conf/workers.properties

5. you can specify log file location, log level, log format too using below string in httpd.conf file.

JkLogFile logs/mod_jk.log
JkLogLevel warn
JkLogStampFormat "[%a %b %d %H:%M:%S %Y]"

6. Now create workers.properties file using below content.

Here
- worker.jvm1.port is ajp port of tomcat application server configured in server.xml file,
- worker.jvm1.host is IP address of tomcat application server,
- worker.jvm1.type is the ajp protocol version,
- worker.jvm1.lbfactor is to assign weight to tomcat application,
- worker.jvm1.max_packet_size is to specify maximum packet size.
Please note that here we have used jvm1 and jvm2. For tomcat server 1, we have used jvm1 and for another tomcat server we have used jvm2.

worker.loadbalancer.balance_workers is used to mention name of tomcat application server's worker name.
worker.loadbalancer.sticky_session - This will enable sticky session.
worker.loadbalancer.method - This will set load balancing method.

7. Now you need to mount Load Balancer in httpd.conf file. You can use below string in httpd.conf file to mount load balancer.

JkMount /* loadbalancer

If you want to exclude any directory then it can be specified before JkMount tag as shown below.

JkUnMount /balancer-manager loadbalancer
JkMount /* loadbalancer

8. Once all above mentioned configuration done, you can restart apache web server and test.

For Sticky Session testing:

If your application works on session, then you may need to configure sticky session at Apache Load Balancer. In workers.properties we have already set worker.loadbalancer.sticky_session to 1. But we need configuration at tomcat too. In both application server edit tomcat/conf/server.xml file and change property as shown below.
Before:
<Engine name="Catalina" defaultHost="localhost" >
After:
<Engine name="Catalina" defaultHost="localhost" jvmRoute="jvm1">
In tomcat app server 1 you can use jvm1 and in second tomcat you can use jvm2. 

Upgrade ImageMagick on Red Hat 5.8/ CentOS

Redhat Enterprise Linux 5.8 provides ImageMagick v 6.2.8. But you may require to upgrade it to higher version. I was looking for RPM of ImageMagick for RHEL 5.8 and I found it from ImageMagick Website. Just downloading and Installing RPM will not work, it took so much time to find its dependency packages and install it. So I have shared this post, I hope if you have this requirement, it will solve your purpose.

Operating System: Red Hat Enterprise Linux 5.8
Architecture: x86_64
ImageMagick: 6.2.8 (new version will be 6.8.5-8)


  • To check current version of ImageMagick use below command.


  • Download ImageMagick RPM using below link.
http://www.imagemagick.org/download/linux/CentOS/x86_64/ImageMagick-6.8.5-10.x86_64.rpm

Now when you will try to install it on RHEL 5.8, you will get below error message for dependency packages.

It was not easy to find dependency packages for ImageMagick, I have gone through different commands, googleing, etc. So finally I have all those dependency RPMs. You can download them using given below links.


ImageMagick-6.8.5-8.x86_64.rpm
OpenEXR-1.4.0a-5.el5.x86_64.rpm
fftw3-3.2.2-3.el5.x86_64.rpm
fltk-1.1.9-4.el5.i386.rpm
fltk-1.1.9-4.el5.x86_64.rpm
jasper-libs-1.900.1-14.el5.x86_64.rpm
libwebp4-0.3.0-31.2.x86_64.rpm
xz-libs-4.999.9-0.3.beta.20091007git.el5.x86_64.rpm
libtool-ltdl-1.5.22-7.el5_4.x86_64.rpm

mess up indent when paste clipboard content in Putty

Finally I found a good solution. It was really frustrating when we copy xml file content from Notepad or Notepad++ and paste it into Putty. You will see each and every line is messed up you have paste in putty. Till the time I got the solution, I used to indent it manually. See below screenshot, the lines are not indent when I paste content of xml file into remote terminal in Putty.


Now I followed below steps to make it indent properly.

Step1 : Paste content in putty wherever you want. You will see content is not indented.


Step2: Now press Esc to go out of "Insert" mode in Putty. Now press "gg" to go to beginning of file in Putty.
Step3: Now press "=".
Step4: Now press Shift+g.

Done.

It should indent all lines as shown in below screen.


Apache's Confusing Access Control

It happens so many times, you write Access Control in Apache by giving "Oder Allow,Deny" or "Order Deny,Allow".

But how would that be executed? I used to check it after applying ACL rules. But now below table will be helpful to evaluate rules.

Example:
Looking at above example, we can see that 192.168.10.100 will be denied as per below table.

Get the CPU information in Linux

Multi-core CPU processors are common nowadays, including dual-core processors, quad-core processors, and hexa-core processors. Also, many server physical machines are equipped with more than one CPU processor. In order to find the number CPUs, and the number of cores per CPU, you can refer to /proc/cpuinfo. A sample /proc/cpuinfo of HP Proliant DL 380 G7 server is as follows. 


To find the number of physical CPUs:
$ cat /proc/cpuinfo | grep "^physical id" | sort | uniq | wc -l
2

To find the number of cores per CPU:
$ cat /proc/cpuinfo | grep "^cpu cores" | uniq
cpu cores : 4

The total number of processors available is the number of physical CPUs multiplied by the number of cores per CPU.

To find the total number of processors:
$ cat /proc/cpuinfo | grep "^processor" | wc -l
16

Note that Intel Xeon 5600 series processors have Intel Hyper-Threading capability. So each core shows up as "two" processors in Linux, and thus the total processor count seen by Linux is 16 (= 2 x 4 x 2).

Compare Files between two directories using md5sum

If you come across situation where you need to compare two directories in two different servers. md5sum command can be used, which will generate md5sum of files in directories and write it to one file. In turn that file can be used to check md5sum at destination. 

Run below command at source location:

find /opt/ -type f -print0 | xargs -0 md5sum > /root/checksums_backup.md5

Once you run above command, it will create /root/checksums_backup.md5 file. You can copy this file to destination server and run below command to check md5sum. 
Note: Source and Destination server should have the same directory structure.

md5sum -c /root/checksums_backup.md5

After running above command, you will see "OK" and "FAILED" output. According to that you can easily make out which files are different from source location.

Check Disk Performance in Linux

We use iostat command to check the disk performance.

Reports that we get from ‘iostat’ are really useful but I myself had a little bit of trouble when trying to interpret the results while using the the first time.


I usually use the iostat command with the following switches:
iostat –d –x <interval>
Where in…
-d = gets rid of the CPU stats so that we can easily concentrate on the I/O only
-x = some additional info like ‘await’ and ‘svctm’ (will discuss them later)
<interval> = this is time in seconds, so every number of <interval> seconds you will get a new ‘iostat’ report
Let’s now see a sample output of ‘iostat’:
If we look at stats above usually we would look at %util and if we see close to 100% it can identify the problem for a single disk setup, but not in a usual multi-disks scenario.
Columns that we look at it in order to identify the problem will be:
syvctm: The average service time (in milliseconds) for I/O requests that were issued to the device
await: The average time (in milliseconds) for I/O requests issued to the device to be served. This includes the time spent by the requests in queue and the time spent servicing them.
This basically means:
 await = syvctm + wait time in queue
Now using the above we can have a basic rule to identify an overloaded setup:
…if you can see a lot of difference in values for ‘syvctm’ and ‘await’ every now and then, that can tell you about I/O requests being going into long waits and this should help you identify the problem.

Japanese Fonts in Putty

I am going to show you here, how to show Japanese characters in file using putty.

(1) First open Putty. Give "Host Name" of the server where you are going to connect.
(2) Click on "Window"->"Translation" in Putty. Select "UTF-8" in Remote Character Set.

(3) Now goto "Windows"->"Appearance" and change Fonts. Set "Ms Gothic" fonts and set "script" to "Japanese" as shown in below figure.

(4) Then open putty session. open Vi editor, and set character encoding in Vim using below command.

:set enc=utf-8

Now you should be able to see Japanese characters in Putty.

Test Multicast in Network


You will come across situation, where you need to identify if multicasting has been enabled or not. Sometimes, its disabled due to some security reasons and to avoid network traffic congestion.

Follow below steps to identify if multicasting enabled or not.

Run the following receiver command on the one server:
java -classpath /root/jgroups-2.11.1.Final.jar org.jgroups.tests.McastReceiverTest -mcast_addr 224.10.10.10 -port 5555

Once the receiver command blocks, simultaneously run the following sender command on another host:
java -classpath /root/jgroups-2.11.1.Final.jar org.jgroups.tests.McastSenderTest -mcast_addr 224.10.10.10 -port 5555

Now two applications should be able to connect and arbitrary lines entered on the sender should appear on the receiver.

Download: jgroups-2.11.1.Final.jar

Setup SSH tunnel to access Remote Desktop through Putty

This post will be helpful if your windows machine is behind firewall and port 3389 is blocked. Although you can access windows machine, but you should have atleast one linux machine access behind firewall. You can access windows machine through SSH tunneling. Ofcourse, port 22 should be accessible!
You can follow below steps to do SSH tunneling using Putty.
(1) open putty. Give the IP address of Linux machine.


(2) Now click on Tunnels under SSH. Give IP address of Windows machine and port . and Give mapped port.


(3) Now click on "Add" button and the click on "Open" button.


(4) Now open "Remote Desktop Connection" and give "localhost:3391" then try to connect. You will see window's logon screen!

Cron Job Output to mail

I was looking for a output of Cron Job, whenever it runs. The output can be a general output of script or any error generated by script.

There's standard output (STDOUT) and standard errors (STDERR). STDOUT is marked 1, STDERR is marked 2. So the following statement tells Linux to store STDERR in STDOUT as well, creating one datastream for messages & errors:


2>&1

Lets say if you want to send cron output to mail then edit below entry in crontab.


13 15 * * * /root/my.sh 2>&1 | mail -s "Cronjob ouput" alpesh.bhavsar@yahoo.c0m


Offsite LDAP server setup

To configure your offsite running LDAP server, you should have below prerequisites.
- Both Master and slave server running with the same slapd.conf file.
- Password less authentication configured to log in from Master server to slave server.

Slave server's IP address: 192.168.19.20

Run below shell script on Master server.

#!/bin/sh

#Below command will export from Master server
/usr/sbin/slapcat -f /etc/openldap/slapd.conf > /ldapbackup/ldap-` date +%d-%m-%Y`.ldif

###############Backup Restoration on LDAP Backup/slave server#########################

#Below command will stop LDAP service on Slave server
ssh root@192.168.19.20 "/etc/init.d/ldap stop"

#This command will remove LDAP schema directory from the server
ssh root@192.168.19.20 "rm -rf /var/lib/ldap/domain.com/"

#This command will create schema directory on Slave server
ssh root@192.168.19.20 "mkdir -p /var/lib/ldap/domain.com/"

#This command will set ldap as owner of Schema directory
ssh root@192.168.19.20 "chown -R ldap.ldap /var/lib/ldap/domain.com/"

#This command will copy backup from Master server to Slave server on /root/ldapback_letest.ldif location
scp /ldapbackup/ldap-` date +%d-%m-%Y`.ldif root@192.168.19.20:/root/ldapback_letest.ldif

#This command will start LDAP service on Slave server
ssh root@192.168.19.20 "/etc/init.d/ldap start"

#This command will stop LDAP service on Slave server
ssh root@192.168.19.20 "/etc/init.d/ldap stop"

#This command will restore LDAP backfile on Slave server
ssh root@192.168.19.20 "slapadd -v -c -l /root/ldapback_letest.ldif -f /etc/openldap/slapd.conf"

#This command will start LDAP on Slave server
ssh root@192.168.19.20 "/etc/init.d/ldap start"

Set JAVA memory parameters in Tomcat

Edit catalina.sh file and add following line. Memory parameters can be set according to requirement.

export JAVA_OPTS="$JAVA_OPTS -server -Xss128k -Xms128M -Xmx1024M -XX:+UseConcMarkSweepGC -XX:+CMSIncrementalMode -XX:MaxPermSize=512M"

If you are running windows XP and having issue while running tomcat. Append the below line in setenv.bat file.
set JAVA_OPTS=%JAVA_OPTS% -Xms256m -Xmx512m -XX:MaxPermSize=256m

Password less authentication from Windows to Linux


This is the most common requirement, I have ever needed. I hope this will help other as well.
Basically here, I am going to show you steps for connecting Linux machine from windows using putty. This is key based authetication not with password.
So first login into linux machine and run below command.

[demouser@ip-10-36-100-23 ~]$ ssh-keygen
Generating public/private rsa key pair.
Enter file in which to save the key (/home/demouser/.ssh/id_rsa):
Created directory '/home/demouser/.ssh'.
Enter passphrase (empty for no passphrase):
Enter same passphrase again:
Your identification has been saved in /home/demouser/.ssh/id_rsa.
Your public key has been saved in /home/demouser/.ssh/id_rsa.pub.
The key fingerprint is:
6f:e1:0d:97:fb:82:b0:2c:48:fc:e4:50:1b:a1:7c:70 demouser@ip-10-36-100-23
[demouser@ip-10-36-100-23 ~]$ 

Now go to .ssh directory and add id_rsa.pub content into authorized_keys file.
[demouser@ip-10-36-100-23 .ssh]$ cd .ssh
[demouser@ip-10-36-100-23 .ssh]$ cat id_rsa.pub >> authorized_keys

Now change permission of all files in /home/demouser/.ssh directory.
[demouser@ip-10-36-100-23 .ssh]$ chmod 600 *

Now copy content of "id_rsa" file and paste it in notepad and save it with demouser.ppk in windows. Now download "puttygen". Open Puttygen and click on Load button, load demouser.ppk file. and click on "Save Private Key". Do not give any password to protect private key. Save the new key.

You can utilize that new key to login into linux server using putty without password based authentication.