Showing posts with label Windows. Show all posts

Microsoft SQL Server 2008 Database Mirroring

Scenario:

We have below two server's details. Both servers are in workgroup. Need to setup database mirroring using certificate based authentication. This is going to be Active-Passive mirroring. So at a time only one server(Active) server will serve Database, another DB server(passive) will not be usable as it will be in synchronization stat.

The Active DB server will be called as “Principal” server and Passive DB server will be called as “Mirror” server.

DB Servers:
Active DB IP: 10.36.100.54
Passive DB IP: 10.36.100.53
DB name: liferayprod

Prerequisites
Keep port 5022 open between two Database servers

Database Backup and Restore Procedure
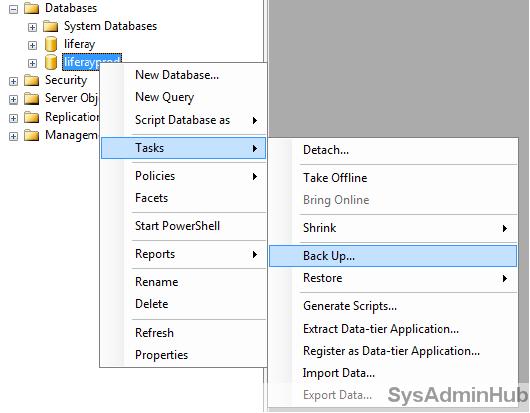
(1) First take Database backup from Principal server. Follow below steps to take database backup.

(2) Select “Backup Type” full and click on Ok button.
(3) Now we need to backup transaction logs.

(4) Now go to location where you have backup database. Copy liferayprod.bak file from that location to Mirror Database.
(5) Now perform below steps on Mirror database to restore database.
(6) Create database, give name “Liferayprod”. Now do right click on that database, click on Task-> Restore → Database.
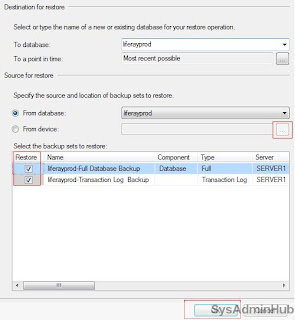
(7) Now locate database file. Do check mark as shown in figure.
(8) Now click on “Options”. Select below two options as shown in figure. Click on “Ok” button.
(9) Once restore complete, you will see database's status as shown in below figure.

Database Mirroring Queries on Principal and Mirror server

Perform below steps on Principal server:

On Active server open Query browser and fire below queries one by one. Follow the instructions given 


Before running below query create c:\certificate directory in server. If required, need to give full permission to "Everyone".

Before running below query, copy mirror server's certificate from mirror server to principal server's c:\certificate directory. 


Now wait for 10 mins before applying below query. As first time it takes time to synchronization.


Perform below steps in Mirror server:

On Passive server open Query browser and fire below queries one by one. 
Before running below query create c:\certificate directory in server. If required, need to give full permission to "Everyone".


Before running below query, copy  Principal server's certificate from principal server to mirror server's c:\certificate directory. 


Now wait for 10 mins before applying below query. As first time it takes time to synchronization.


Varify Mirroring Status

(1) Once you run queries for mirroring, DB mirroring should be started. On the mirror server you should see below mentioned status.
(2) At the principal server, you should be able to see below mentioned status.
(3) We can check mirroring status as shown in below figure. Right click on Database → Tasks → Launch Database mirroring Monitor.

Manual Failover

If you want to do manual Failover then use below query. Which will make Principal database as Mirror Database and Mirror Database->Principal database.


You will need to do manual Fail over when both databases are not connected with each other. There could be the reason like, database server it self is down or may be blocked port. So in that case you can remove database server's mirroring function. Then database will act like standalone database server. Later on you can configure mirroring once you are able to fix connectivity issue. You can use below command to remove database from mirroring.


To bring the mirror online manually after dropping mirroring, issue the following command (you can’t do it while it is still mirrored).


Note: At the time of reconfiguration, you may need to delete “master key” and endpoint through below query.

→ On Mirror server follow below steps.


→ On principal Server follow below steps.


Apache Load Balancer Configuration using mod_jk

Why Apache Load Balancer

We can use Apache Load Balancer module (mod_jk) to optimizes resource use, maximizes throughput, minimizes response time, and avoids overload as well as for auto failover.

How it can be utilized

Lets assume that you have two tomcat web applications running on two different servers. Now you want to make your application highly available and also want to distribute traffic across both tomcat application servers. So here we can configure one web server(apache) with mod_jk module, which will be act as a frontend server and two tomcat application servers will act as backend server.

Client request for your application will come to Web server(apache). Based on mod_jk configuration, apache will send request to both tomcat applications. Cool!!!!

How to configure mod_jk on Apache Web server.

1. First download mod_jk source from below mentioned link. Please choose package according to your server architecture(32bit or x64).
For Linux:
http://apache.petsads.us//tomcat/tomcat-connectors/jk/tomcat-connectors-1.2.37-src.tar.gz
For Windows:
http://apache.petsads.us//tomcat/tomcat-connectors/jk/binaries/windows/
2. If you are using windows then you need to simply copy mod_jk.so file into your apache's module directory.
If you are using linux then you will have to make mod_jk.so file using below steps.
1.1 Extract tomcat-connectors-1.2.37-src.tar.gz.
"tar -zxvf tomcat-connectors-1.2.37-src.tar.gz"
1.2 Now configure it using below command.
"./configure --with-apxs=/usr/sbin/apxs"
1.3 Now run make and then make install.
"make && make install"
Note: If you are getting any error, then please check if "httpd-devel" package is installed or not.
1.4 If above 3 commands run successfully, then it would have created mod_jk.so file into /etc/httpd/modules/ directory.

3. Now Load that module in apache's httpd.conf file using below string. You can copy that string at bottom of httpd.conf file.
#
# Load mod_jk
#
LoadModule jk_module modules/mod_jk.so

4. Now you need to specify workers.properties file path in httpd.conf file, so that apache can read configuration of both tomcat applications.

JkWorkersFile conf/workers.properties

5. you can specify log file location, log level, log format too using below string in httpd.conf file.

JkLogFile logs/mod_jk.log
JkLogLevel warn
JkLogStampFormat "[%a %b %d %H:%M:%S %Y]"

6. Now create workers.properties file using below content.

Here
- worker.jvm1.port is ajp port of tomcat application server configured in server.xml file,
- worker.jvm1.host is IP address of tomcat application server,
- worker.jvm1.type is the ajp protocol version,
- worker.jvm1.lbfactor is to assign weight to tomcat application,
- worker.jvm1.max_packet_size is to specify maximum packet size.
Please note that here we have used jvm1 and jvm2. For tomcat server 1, we have used jvm1 and for another tomcat server we have used jvm2.

worker.loadbalancer.balance_workers is used to mention name of tomcat application server's worker name.
worker.loadbalancer.sticky_session - This will enable sticky session.
worker.loadbalancer.method - This will set load balancing method.

7. Now you need to mount Load Balancer in httpd.conf file. You can use below string in httpd.conf file to mount load balancer.

JkMount /* loadbalancer

If you want to exclude any directory then it can be specified before JkMount tag as shown below.

JkUnMount /balancer-manager loadbalancer
JkMount /* loadbalancer

8. Once all above mentioned configuration done, you can restart apache web server and test.

For Sticky Session testing:

If your application works on session, then you may need to configure sticky session at Apache Load Balancer. In workers.properties we have already set worker.loadbalancer.sticky_session to 1. But we need configuration at tomcat too. In both application server edit tomcat/conf/server.xml file and change property as shown below.
Before:
<Engine name="Catalina" defaultHost="localhost" >
After:
<Engine name="Catalina" defaultHost="localhost" jvmRoute="jvm1">
In tomcat app server 1 you can use jvm1 and in second tomcat you can use jvm2. 

mess up indent when paste clipboard content in Putty

Finally I found a good solution. It was really frustrating when we copy xml file content from Notepad or Notepad++ and paste it into Putty. You will see each and every line is messed up you have paste in putty. Till the time I got the solution, I used to indent it manually. See below screenshot, the lines are not indent when I paste content of xml file into remote terminal in Putty.


Now I followed below steps to make it indent properly.

Step1 : Paste content in putty wherever you want. You will see content is not indented.


Step2: Now press Esc to go out of "Insert" mode in Putty. Now press "gg" to go to beginning of file in Putty.
Step3: Now press "=".
Step4: Now press Shift+g.

Done.

It should indent all lines as shown in below screen.


Apache's Confusing Access Control

It happens so many times, you write Access Control in Apache by giving "Oder Allow,Deny" or "Order Deny,Allow".

But how would that be executed? I used to check it after applying ACL rules. But now below table will be helpful to evaluate rules.

Example:
Looking at above example, we can see that 192.168.10.100 will be denied as per below table.

Test Multicast in Network


You will come across situation, where you need to identify if multicasting has been enabled or not. Sometimes, its disabled due to some security reasons and to avoid network traffic congestion.

Follow below steps to identify if multicasting enabled or not.

Run the following receiver command on the one server:
java -classpath /root/jgroups-2.11.1.Final.jar org.jgroups.tests.McastReceiverTest -mcast_addr 224.10.10.10 -port 5555

Once the receiver command blocks, simultaneously run the following sender command on another host:
java -classpath /root/jgroups-2.11.1.Final.jar org.jgroups.tests.McastSenderTest -mcast_addr 224.10.10.10 -port 5555

Now two applications should be able to connect and arbitrary lines entered on the sender should appear on the receiver.

Download: jgroups-2.11.1.Final.jar

Setup SSH tunnel to access Remote Desktop through Putty

This post will be helpful if your windows machine is behind firewall and port 3389 is blocked. Although you can access windows machine, but you should have atleast one linux machine access behind firewall. You can access windows machine through SSH tunneling. Ofcourse, port 22 should be accessible!
You can follow below steps to do SSH tunneling using Putty.
(1) open putty. Give the IP address of Linux machine.


(2) Now click on Tunnels under SSH. Give IP address of Windows machine and port . and Give mapped port.


(3) Now click on "Add" button and the click on "Open" button.


(4) Now open "Remote Desktop Connection" and give "localhost:3391" then try to connect. You will see window's logon screen!

Pidgin - A replacement of Yahoo messenger

Nowadays I have started using Pidgin as IM. I was using yahoo but it was consuming near about 60M memory. So I was looking for alternate solution and I found Pidgin. It takes around 13M memory. So pretty light weight.
I installed it, and was not comfortable with look and feel of it. I searched for applying skin to it. And I did it through below steps.
As of version 2.7.0, Pidgin ships with a private GTK+ runtime and doesn't include extra themes or a GUI theme switching application.
There is an easy way to use the GTK+ theme binaries and theme switcher.
Download the GTK+ Themes and GTK+ Theme Switcher zip files and extract them to a temporary directory.
Copy the lib and share directories from the GTK+ Themes zip file into your \Gtk directory (you want to merge those with the existing lib and share directories). Copy the gtk2_prefs.exe from the GTK Theme Switcher zip file into your \Gtk\bin directory.
You can now run the gtk2_prefs.exe applications to choose a theme. You probably will want to use the "Apply for all users" checkbox so that the changes are made to Pidgin's private GTK+ runtime.
Note: If you had previously set up a user-specific GTK+ theme with the global GTK+ Runtime, you will need to delete or rename the %USERPROFILE%/.gtkrc-2.0 file in order to have your changes take effect.

Register Alfresco FSR as Windows Service running on 64 bit using YAJSW

(1) First download the latest stable build of YAJSW from here.
(2) Unzip yajsw-stable-11.0.zip in D:\apps\yajsw folder.
(3) Install Alfresco FSR into D:\apps\FSR folder. (Ex. D:\apps\FSR)
(4) Copy all *.jar files from D:\apps\FSR folder to D:\apps\yajsw\lib folder.
(5) Copy application-context.xml and shutdown-context.xml files from D:\apps\FSR to D:\apps\yajsw\bat folder.
(6) Now open coammand prompt. Goto D:\apps\FSR directory and run below command.

jar cf deployment-config.jar deployment.properties deployment/*

Above command will create “deployment-config.jar” jar file in D:\apps\FSR directory.
(7) Now Start FSR manually and check its PID in “Task Manager”. Note down the PID of Alfresco FSR.
(8) Now goto D:\apps\yajsw\bat folder and run below command.

genConfig.bat “PID of Alfresco FSR”

Ex: genConfig.bat 1492

(9) This will generate the wrapper.conf file under D:\apps\yajsw\conf folder. Now Open wrapper.conf file and set below path.
Note: please make changes of path as per your configuration.

wrapper.working.dir=D:\\apps\\FSR\\
wrapper.java.app.mainclass=org.alfresco.deployment.Main
wrapper.console.title=Alfresco Deployment Server
wrapper.ntservice.name=Alfresco Deployment Server
wrapper.ntservice.displayname=Alfresco Deployment Server
wrapper.ntservice.description=Alfresco Deployment Server
wrapper.java.command = C:\\Program Files\\Java\\jdk1.6.0_22\\bin\\java
wrapper.app.parameter.1 = application-context.xml
wrapper.java.additional.1=-server
wrapper.java.additional.2 = -Djava.ext.dirs=.;C:\\Program Files\\Java\\jdk1.6.0_22\\jre\\lib\\ext


(10) Execute Alfresco FSR as console application by calling and confirm that Alfresco FSR is running correctly.

D:\apps\yajsw\bat\runConsole.bat

(11) If everything is ok then install Alfresco FSR as Windows Service call using below command.

D:\apps\yajsw\bat\installService.bat

Done!!!

Google

tail command in Windows using Notepad++

How to use tail command in Windows using Notepad++
 (1) Download DocMonitor plugin using below link.
 http://sourceforge.net/projects/npp-plugins/files/DocMonitor/
 (2) Open Notepad++. Go to Setting -> Inport -> Import Plugin. Give downloaded dll file's path and restart notepad++.
 (3) Now open document in notepad++ you want to monitor and click on Plugins -> Document Monitor -> start Monitoring.

MSSQL backup Script retaining 3 days backup

I was looking for a script, which takes backup of MS SQL databases and store it some location. The retention period should be 3 days. I googled and found script. Run below steps if you have such requirement.

First we will create a script which will search files older than 3 days and delete them. So copy/paste below script content into "DeletesOlderThan.js" file.

Please note: this file will delete content of the current directory, so before using this file need to go to particular folder which data needs to be deleted.

To invoke this file, run following command. (Here 3 is the #day. This command will delete files older than 3 days)

wscript "e:\DeletesOlderThan.js" 3


////////////////////////////////////////////////////////
// Deletes file older than a number of days
// in the current directory
////////////////////////////////////////////////////////
// Usage: wscript DeleteOlderThan.js [#Days]
// By default, remove files older than 30 days
////////////////////////////////////////////////////////

function removeDays(date, nDays)
{
var dateRet = date
return dateRet.setDate(date.getDate() - nDays);
}

function addSlash(strPath)
{
var c = strPath.substr(-1, 1);
if( c !== '\\' && c !== '/' )
{
strPath += '\\';
}
return strPath;
}

// Read arguments
var nDays = WScript.Arguments(0) || 30;

// Create system objects
var fs = WScript.CreateObject("Scripting.FileSystemObject");
var shell = WScript.CreateObject("WScript.Shell");

// Retrieve current directory
var strDirectoryPath = addSlash(shell.CurrentDirectory);

// Compute date
var dateNow = new Date();
var dateTest = removeDays(dateNow, nDays);

// Iterate on files
var folder = fs.GetFolder(strDirectoryPath);
var files = folder.Files;

for( var it = new Enumerator(files); !it.atEnd(); it.moveNext() )
{
var file = it.item();

if( file.DateLastModified < dateTest)
{
file.Delete(true);
}
}


For MS SQL db backup, I am just taking its data and log file backup. So below command will be enough I guess. (In below command I am taking backup of "mydb" database. I have installed 7zip to compress backup).


"C:\Program Files\7-Zip\7z.exe" a -tzip e:\Backup\mydb-%V_Day%-%V_Month%-%V_Year%.zip "C:\Program Files\Microsoft SQL Server\MSSQL10_50.SQLEXPRESS\MSSQL\DATA\mydb.mdf" "C:\Program Files\Microsoft SQL Server\MSSQL10_50.SQLEXPRESS\MSSQL\DATA\mydb.ldf"

I hope this will be helpful.

Set JAVA memory parameters in Tomcat

Edit catalina.sh file and add following line. Memory parameters can be set according to requirement.

export JAVA_OPTS="$JAVA_OPTS -server -Xss128k -Xms128M -Xmx1024M -XX:+UseConcMarkSweepGC -XX:+CMSIncrementalMode -XX:MaxPermSize=512M"

If you are running windows XP and having issue while running tomcat. Append the below line in setenv.bat file.
set JAVA_OPTS=%JAVA_OPTS% -Xms256m -Xmx512m -XX:MaxPermSize=256m

Password less authentication from Windows to Linux


This is the most common requirement, I have ever needed. I hope this will help other as well.
Basically here, I am going to show you steps for connecting Linux machine from windows using putty. This is key based authetication not with password.
So first login into linux machine and run below command.

[demouser@ip-10-36-100-23 ~]$ ssh-keygen
Generating public/private rsa key pair.
Enter file in which to save the key (/home/demouser/.ssh/id_rsa):
Created directory '/home/demouser/.ssh'.
Enter passphrase (empty for no passphrase):
Enter same passphrase again:
Your identification has been saved in /home/demouser/.ssh/id_rsa.
Your public key has been saved in /home/demouser/.ssh/id_rsa.pub.
The key fingerprint is:
6f:e1:0d:97:fb:82:b0:2c:48:fc:e4:50:1b:a1:7c:70 demouser@ip-10-36-100-23
[demouser@ip-10-36-100-23 ~]$ 

Now go to .ssh directory and add id_rsa.pub content into authorized_keys file.
[demouser@ip-10-36-100-23 .ssh]$ cd .ssh
[demouser@ip-10-36-100-23 .ssh]$ cat id_rsa.pub >> authorized_keys

Now change permission of all files in /home/demouser/.ssh directory.
[demouser@ip-10-36-100-23 .ssh]$ chmod 600 *

Now copy content of "id_rsa" file and paste it in notepad and save it with demouser.ppk in windows. Now download "puttygen". Open Puttygen and click on Load button, load demouser.ppk file. and click on "Save Private Key". Do not give any password to protect private key. Save the new key.

You can utilize that new key to login into linux server using putty without password based authentication.

Installing Java on Windows

How to install Java JDK in windows XP and set up Java_home Environment and Java Path


Java is a programming language that allows programs to be written that can then be run on more than one type of operating system. A program written in Java can run on Windows, UNIX, Linux etc. as long as there is a Java runtime environment installed.This tutorial will show how to install Java and set up Java Environment in windows XP.

1. Download Java: The very first thing to do is download the Java Developer's Kit (jdk) onto your computer. Go to this download link to downalod the latest version of JDK.

2. Install Java: Double click on the file you just download. The installer will guide you through the installation. You should install java in either C:/java or C:/ program files/Java. Make sure you remeber where you install it, we are gonna need it. For this tutorial, lets assume, we are installing java in C:\Program Files\Java

3. Set up JAVA_HOME environment variables: 

  1. Right click on the My Computer icon from start menu and select properties

  2. Click the Advanced Tab

  3. Click the Environment Variables button

  4. Under System Variable, click New

  5. Enter the variable name as JAVA_HOME

  6. Enter the variable value as the install path for the Development Kit (C:\Program Files\Java\jdk1.5.0_14\)

  7. Click OK

  8. Click Apply Changes


4.Set Up Java Path:

  1. Follow the first three steps from 3. set up java environment to go to the Environment Variable window.

  2. In the system Variables, find "Path" (they are odered alphabetically so keep scrolling until you reach P). Select it and click edit.

  3. Now, add this" %JAVA_HOME%\bin; " add the end of the variable value with the quotes "" and with the semicolon ; . For example, if the variable value already had %SystemRoot%;%SystemRoot%\system32;...you just add %JAVA_HOME%\bin; with it making the whole variable value %SystemRoot%;%SystemRoot%\system32;%JAVA_HOME%\bin;

  4. Click Ok and Apply changes.


5. Test: To test that you have correctly installed java go to Start>Run>type cmd to open command prompt.
Then, type
C:\Users\username>java -version
C:\Users\username>javac -version

Successful installation of java should show appropriate information.


6. Done!!!!!
If you have any  question or problem regarding how to install Java and set up Java_home Environment and Java Path in windows XP, ask me in the comment ...
If you want to install it on Linux platform, follow below link.

http://alpeshbhavsar.wordpress.com/2010/06/14/installing-java-in-linux/

MySQL Error : Can't get hostname for your address

When try to connect remote MySQL Sever 5.5 then it generate an error message 'Can't get host name for your address'. I don't know the exact reason for this error, but in my assumption MySQL Server can't resolve the host IP/name which we pass to server for establishing connection.To solve this issue, just add 'skip-name-resolve '  in my.ini /my.cnf under [mysqld] and restart the server. In windows this file location is

C:\Program Files\MySQL\MySQL Server 5.5\my.ini

[mysqld]
skip-name-resolve

svn comments validation at commit

Here we are going to put validation on svn comments while doing commit. At the time of commit if logs are not given then commit will failed giving errors.

Step1: Go to folder svn_repository/hook. Copy pre-commit.tmpl to pre-commit

Step2: Now Add following line into it.

set -e

/Location/to/svn/repository/hooks/checkCommentNotEmpty.sh "$1" "$2"

Step3: Now create checkCommentNotEmpty.sh file into hook directory. Add following content into that file.

#!/bin/bash

REPOS="$1"

TXN="$2"

SVNLOOK=/usr/bin/svnlook


if [`$SVNLOOK log -t $TXN $REPOS` != ""]; then

echo "" 1>&2

echo "*** Your commit has been blocked because you did not give any log message or your log message was too short." 1>&2

echo "Please write a log message describing the purpose of your changes and then try committing again." 1>&2

exit 1

else

exit 0

fi

Step 4: now give execute permission on both file then try commit without /with giving comments.