Why RAID?
RAID stands for Redundant Array of Inexpensive Disks or Redundant Array of Independent Disks. In RAID we join two or more harddisks and make one logical disk. Which gives below mentioned benefits.
6. Now we need to format /dev/md0 RAID partition using mkfs.ext3. You can choose the partition type you want. Once format is done, you can mount it in /etc/fstab.
RAID stands for Redundant Array of Inexpensive Disks or Redundant Array of Independent Disks. In RAID we join two or more harddisks and make one logical disk. Which gives below mentioned benefits.
- Stopping data loss, when one or more disks of the array fail.
- Getting faster data transfers.
- Getting the ability to change disks while the system keeps running.
- Joining several disks to get more storage capacity; sometimes lots of cheap disks are used, rather than a more expensive one.
There are different RAID level, which we can make use of based on our requirement. I am not going into deep on level, but one of the most popular RAID level that is "RAID 5", I am going to show you here through example on CentOS.
Why RAID 5?
RAID 5 uses "striping with distributed parity" algorithm. In which each block on data will be stored in three different places. Ofcourse, RAID 5 needs atleast 3 disks. When any write request comes, it stores block on 2 disks(disk A and disk B) and on third disk(disk C) it will write parity information. On the next write request, it will store block on another 2 disk (disk B and disk C) and on third disk C it will store parity information. Like this, it continues writing parity and data blocks on all three disk. Due to parity information on each disk, we will get lesser storage space as 1/3 space will be used for parity.
In case if any disk fails, RAID 5 will not stop. It will keep working in "downgraded mode". You will feel slow performance. Once you add another disk into RAID 5 array, it will start building array and after sometime, RAID 5 will act as usual.
Steps to configure RAID 5 on CentOS
Prerequisites:
Additional 3 disks for RAID 5
mdadm-2.6.9-3.el5 package installed
1. Lets see how many disks are installed using "fdisk -l" command.
 |
| fdisk -l |
You can see here /dev/sdb, /dev/sdc and /dev/sdd is unpartitioned. We need to create partition so that it can be used in RAID 5.
2. using "fdisk" command we can create partition. So first we will create partition for /dev/sdb disk. Give command as shown below.
 |
| fdisk /dev/sdb |
Once you give "fdisk /dev/sdb" command, you need to press "n", then press "p" and then press "1' for partition number. You can check partition using "p".
 |
| print partition using "p" |
Now we need to change "ID" from "83" to "fd". Please see below image and follow steps.
 |
| Change partition type |
Now you can see partition "ID" is changed from "83" to "fd". Now we need to save changes, so press "w" as shown in below image.
 |
| Save partition |
Now once again you can see partition status using "fdisk -l" command. You will see output as below.
 |
| fdisk -l |
you can see here /dev/sdb partition is created with "ID" as "fd".
3. Follow step #2 for /dev/sdc and /dev/sdd. Once you will create partition for all 3 disks, you will see below output.
 |
| Show partition information |
4. Now we need to use "mdadm" command to create RAID 5 array. The command it self is self explanatory.
 |
| mdadm create partition |
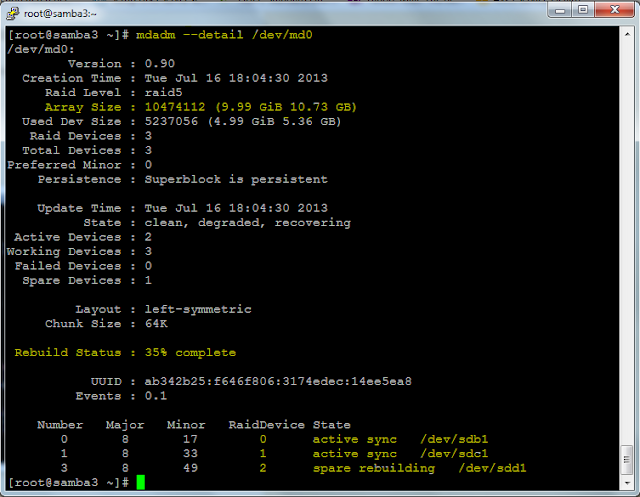
5. Once you create partition using mdadm command, it doesn't create RAID partition instantly, it takes time. you can see status using "mdadm --detail /dev/md0" command as shown below.
 |
| mdadm show details |
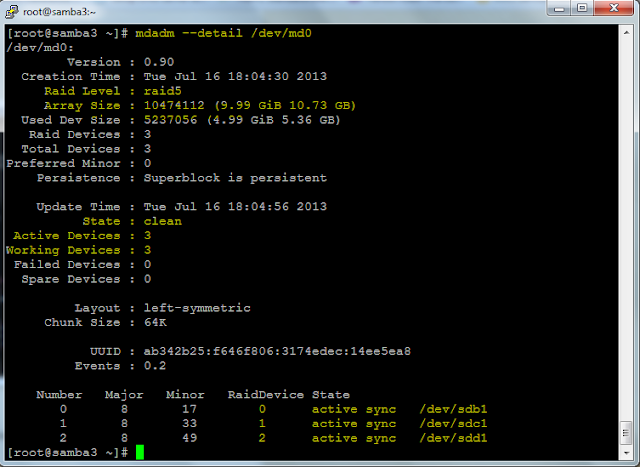
You can notice here "spare rebuilding" for /dev/sdd1. After some time you will see "active sync" for /dev/sdd1.
 |
| mdadm show details |
 |
| Format Partition |
I hope this post will be helpful to configure RAID 5 in your server.
No comments:
Post a Comment