Amazon S3 bucket policy to grant access to particular bucket

{
  "Id": "Policy1422882024097",
  "Statement": [
    {
      "Sid": "Stmt1422881897244",
      "Action": [
        "s3:ListBucket"
      ],
      "Effect": "Allow",
      "Resource": "arn:aws:s3:::testbucket"
    },
    {
      "Sid": "Stmt1422881932883",
      "Action": [
        "s3:DeleteObject",
        "s3:GetObject",
        "s3:PutObject"
      ],
      "Effect": "Allow",
      "Resource": "arn:aws:s3:::testbucket/*"
    },
    {
      "Sid": "Stmt1422871876524",
      "Action": [
        "s3:GetBucketLocation",
        "s3:ListAllMyBuckets"
      ],
      "Effect": "Allow",
      "Resource": "arn:aws:s3:::*"
      }
  ]
}

You can apply this policy on user.

HAProxy Load balancer on Virtual IP

This would be the micro post!

Requirement:

I have configured 2 HAProxy load balancer which sends request to 3 different backends. But I wanted to make both HAProxy load balancer to be Highly Available. So I was looking for solution approach to assign Virtual IP address which keeps floating between two HAProxy nodes based on their availability. So I found "ucarp" package. Quite simple and 4 lines configuration makes your thing work.

So I did below mentioned changes in /etc/ucarp/vip-001.conf file of ucarp.

VIP_ADDRESS="192.168.133.250"
PASSWORD="simple_password"
BIND_INTERFACE="eth0"
OPTIONS="--shutdown --preempt"
SOURCE_ADDRESS="192.168.133.130"

Here, 
VIP_ADDRESS is the IP address which you want to assign as Virtual IP. 
PASSWORD parameters needs to be same in both HAProxy load balancer to make sure that both ucarp are sharing same information.
BIND_INTERFACE is the network interface you have in your server
SOURCE_ADDRESS is the Local Static/Dynamic IP addres associated with machine. You need to set this address according to the server's IP address.

Once you make above mentioned you can save and make "ucarp" service running by giving below command.

service ucarp start

And make it running at startup by below command.

chkconfig ucarp on

Using Gmail ID for sending Emails in Centos

Long story in short. 

Follow below steps.

1. Install "ssmtp" package in Centos.

yum install ssmtp

2. Now open /etc/ssmtp/ssmtp.conf file and change below mentioned details.

mailhub=smtp.gmail.com:587
Hostname=host@example.com #not sure if this really matters
FromLineOverride=YES
UseSTARTTLS=YES
AuthUser=test@gmail.com
AuthPass=Th!sP@ssword!
TLS_CA_File=/etc/pki/tls/certs/ca-bundle.crt

3. Now open "/etc/ssmtp/revaliases" file and add below line.

root:test@gmail.com:smtp.gmail.com:587

4. Now run alternatives command and select sendmail.ssmtp as a default mta

alternatives --config mta

5. Now you can test mail using mutt.

Disable Email notification in Magento Test Environment

After a long time I got something to post in this blog. Today I was setting up test magento instance and I took replica of the production system and installed and configured in my local VirtualMachine. My intention was to do some load testing and some RnD on test magento instance. But as I have Production data in my test machine, I thought to disable all email notification, so that in any case no email should be fired from my test machine.

So below steps I followed to stop mail functionality in magento.

1. You need to login into magento admin panel. In the admin panel go to "System" => "Configuration" => "System" and then in "Disable Email Communications" select "Yes". Then click on "Save Config" button on upper right side in Admin panel to save changes.


2. I had configured AWS SES for Email notification so I used another module called "SMTP Pro". So again go to "System" => "Configuration" => "SMTP Pro". Now in "Email Connection" select "Disabled" and save config.

3. Third option, I thought to turn off from the Server it self. To be at safer side, its good to disable local smtp. I used below command to turn off SMTP in my server.

/etc/init.d/postfix stop
chkconfig postfix off

I don't think anything else we can do to turn off Email Notification.

Using Webinject with Nagios to check site's availability and responsetime

There are couple of plugins available to check website response time and availability but lets check how webinject checks can be helpful.

Installing Webinject
1. Download webinject source and extract it in your Nagios plugins directory.
http://www.webinject.org/download.html

2. After you extract, you may need to install perl modules. I had to install below mentioned modules. I used "cpan" command to install modules. You may need to install additional modules according to your server setup.

cpan
> install Crypt::SSLeay

Note: You can identify which modules needs to be install by running below command.
[root@ip-10-126-117-63 webinject]# ./webinject.pl -c testcases.xml
Can't locate Crypt/SSLeay.pm in @INC (@INC contains: /usr/local/lib64/perl5 /usr/local/share/perl5 /usr/lib64/perl5/vendor_perl /usr/share/perl5/vendor_perl /usr/lib64/perl5 /usr/share/perl5 .) at ./webinject.pl line 27.
BEGIN failed--compilation aborted at ./webinject.pl line 27.

Look at text marked in bold. This shows missing perl modules. So you can simply run below cpan command.

[root@ip-10-126-117-63 webinject]#cpan
cpan[1]> install Crypt::SSLeay

3. Now you can check if webinject script will work or not using below command. Once you are done with verification, you can start creating webinject script.

[root@ip-10-126-117-63 webinject]# ./webinject.pl -c testcases.xml

You should not see any perl modules errors in above command's output. If everything goes fine, you will see result of testcase execution.

Creating Webinject Test script

In this example we will create script to check availability of www.sysadminhub.in and we will check if "System Administrator's Hub" text is available or not. If that text is not present then we can send generate error.

<testcases repeat="1">
<case
id="1"
description1="Check if www.sysadminhub.in is available"
description2="This will check response code. If it is not 200 then it will show error"
method="get"
url="http://www.sysadminhub.in"
verifyresponsecode="200"
/>
<case
id="2"
description1="In this case we will check for text 'System Administrator's Hub'"
description2="If that text is missing in page then it will generate error"
method="get"
url="http://www.sysadminhub.in"
verifypositive="System Administrator's Hub"
/>
</testcases>
In above script we have used "get" method and verifyresponsecode & verifypositive are to check response code of site and check text from site respectively.

How to use with Nagios

Here apart from testcase we will have to create config file for each testcase. You can specify different globaltimeout option for different testcase. I have set below content for my script.
<testcasefile>testcase.xml</testcasefile>
<useragent>WebInject Application Tester</useragent>
<timeout>10</timeout>
<globaltimeout>20</globaltimeout>
<reporttype>nagios</reporttype>
Here "reporttype" is the important factor. This will produce output which Nagios can use to parse performance data. So after creating your testcase and config xml, you can use below mentioned command.

[root@ip-10-126-117-63 webinject]# ./webinject.pl -c config.xml testcases.xml WebInject OK - All tests passed successfully in 3.237 seconds |time=3.237;;;0

Using Amazon EC2 command line interface

You can easily manage your Amazon AWS resource like Amazon EC2 instances, EBS volumes & VPC, etc.. through command line tools.

Before you start using these tools, it needs dependency softwares to run.

In this example, I am going to show you AWS command line tool configuration on Linux.

Prerequisites:
This tools requires Java 1.6 or later. Also we need to make sure that JAVA_HOME is set. You can refer this link to install/configure JAVA on linux.

Download and Install AWS command line tools.

1. Download AWS tools using below URL.

wget http://s3.amazonaws.com/ec2-downloads/ec2-api-tools.zip

2. Extract it at some location. For example, I will extract these tools at /home/ec2 directory.

3. Once you extract zip file at /home/ec2 folder, you need to set EC2_HOME variable now. You can set this variable in bashrc or in /etc/profile file.

export EC2_HOME=/home/ec2
export PATH=$PATH:$EC2_HOME/bin

4. Now you should be able to use tools. But its good to configure access_key and secret_key before we use these tools. As these tools requires them to authenticate. So you can include them in bashrc or /etc/profile.

export AWS_ACCESS_KEY=your-aws-access-key-id
export AWS_SECRET_KEY=your-aws-secret-key

5. Once you are done with all above command, you can check "ec2-describe-regions". This command will show you one or more region which are available to you.

Note: You need to have proper privileges associated with Access key to perform action on resources.

Enable JMX access in Alfresco to monitor JVM memory usage through VisualVM or Jconsle

One small post but useful for those who wants to monitor Alfresco's JVM memory usage through VisualVM.

To enable connection through JMX, first you need to enable it in setenv.sh file. Simply add below line and restart Alfresco. You should be able to connect to JMX.

Linux:
export JAVA_OPTS="${JAVA_OPTS} -Dcom.sun.management.jmxremote -Djava.net.preferIPv4Stack=true"

Winodws:
set JAVA_OPTS=%JAVA_OPTS% -Dcom.sun.management.jmxremote -Djava.net.preferIPv4Stack=true

In VisulVM, you can connect using below string. Please select "Add JMX connection".

mongo db startup init.d script on CentOS/Redhat

Here we are going to create init script for mongodb, so that mongodb can start at the time of boot. So follow below steps to configure mongodb startup script.


(1) Create a file /etc/init.d/mongodb with below content. You may need to change path of mongod. In below script the path is "/opt/mongo/bin/mongod". But you need to change according to your installation of mongodb. Also you may need to change "mongodb_user". This will run mongo db as specified user.
(2) Now make it executable using below command.

chmod a+x /etc/init.d/mongodb

(3) Now you need to make it runable in runlevel 3,4 & 5. So use below command.

chkconfig --level 345 mongodb on

chkconfig --list mongodb

You can see mongodb service is configured to run at runlevel 3 4 & 5.

(4) Once you are done with all above 3 steps, you can start & stop mongodb service.
Note: please make sure to kill the currently running mongodb process. 

Skype Audio Sound issue in Ubuntu 13.10

I am trying to remove total dependency on Windows 7 by using Open Source Ubuntu 13.10. Ubuntu 13.10 (Saucy Salamander) seems quite stable. Except two issue I faced recently with Skype audio problem and Vmware Player(incompatible with kernel 3.1x).

To solve Skype audio issue, below command was helpful.

Installing VMware Player on Ubuntu 13.10

I mostly choose Vmware Player as virtualization platform. There is one more Virtualization tool available "VitualBox". I have used "VirtualBox" also, but due to lack of networking options I do not prefer to use "VirtualBox".

Vmware Player provides good options for networking like Bridge network, host only and Natted. I prefer to use Natted, as all Guest OS can communicate with each other, with Host OS and with Internet too.

When I started installation of VMware Player in Ubuntu 13.10, I got some errors. When I checked "dmesg" I found that there was segmentation fault error with one of the library file.

I searched on Internet, and then I found that the problem was not with any library file but with the Kernel.

Ubuntu 13.04 is having kernel 3.11.0-12-generic, while VMware do not support this kernel version. So finally searching from some of the forum I found below steps to overcome issue of VMware Player installation on Ubuntu 13.10.

First you need to download VMware player for Ubuntu from Vmware website. I got "VMware-Player-5.0.2-1031769.x86_64.bundle" for me.

Now before we start installation, we need to install prerequisites. Use below command.

Then install Vmware Player using below command.

You will see progress of installation, and it will finish. But when you start Vmware Player, it will ask to install some modules. When you click on "Install" button, it will show you "Send Crash Report".

Now follow below steps to solve your issue.

Once done, you can start VMware Player without any issue.

Hope this will help, who wants to run VMware Player in Ubuntu 13.10.

Installing Php 5.2 on CentOS/Redhat

When it comes to php installation, most of us will use simple yum utility in CentOS or RedHat Linux. But when you would try to install php using yum, you will notice that it will install latest version of php (5.3 or later) binaries.

But most of the time it has happened that Development team has asked me to install older release of php(php v. 5.2). I have spent so much time in downgrade process of php version, but finally I have figured out how to install older release in few minutes. So below process would help you to install php 5.2 in latest release of CentOS.

So before we start, lets first remove all php packages using below command. You may need to run below command 2-3 times to remove all php packages.

Once you run above command, you can check with "rpm -qa | grep php" command if still there is any php package is installed.

Now we need to get webtatic repository and install it. You can use below command to download and install webtatic repository.


Once you are done with installation, you need to fire below command to install php 5.2 in Centos.


Of course you can edit above command to install your desired php library files.

Hope this post would be helpful who wants to install php 5.2 in CentOS.

Alfresco Fetal Error: libdcpr.so+0x1330b Java Crashed

You would have seen java crash error log. This message does not show any information like due to which class or process java crashed. But finally we found that one culprit document we were uploading in Alfresco, which was having "Hindi" characters. So if you come across this kind of error, check your recently uploaded document if it is having language other than English.

Hope this will help!

#
# A fatal error has been detected by the Java Runtime Environment:
#
#  SIGSEGV (0xb) at pc=0x00007fbcd266430b, pid=8028, tid=140448967481088
#
# JRE version: 6.0_27-b07
# Java VM: Java HotSpot(TM) 64-Bit Server VM (20.2-b06 mixed mode linux-amd64 compressed oops)
# Problematic frame:
# C  [libdcpr.so+0x1330b]  signed char+0xbb
#
# An error report file with more information is saved as:
# /opt/alfresco-4.0.1/hs_err_pid8028.log
#
# If you would like to submit a bug report, please visit:
#   http://java.sun.com/webapps/bugreport/crash.jsp
# The crash happened outside the Java Virtual Machine in native code.
# See problematic frame for where to report the bug.
#

Alfresco Performance tuning by setting JVM memory parameters

Since last couple of days I was working on Alfresco's JVM tuning. I faced below issues when it was configured previously.
  • OldGen space was utilized completely
  • Per Survivor Space was too utilized completely
  • Full GC was taking time which leads to stop application responding for time being
My previous JVM settings were as given below:

export JAVA_OPTS="-Xms2048m -Xmx4096m -Xss1024k -XX:MaxPermSize=512m -XX:NewSize=1024m -XX:+UseConcMarkSweepGC -XX:+UseCodeCacheFlushing -XX:ReservedCodeCacheSize=64m -Djava.awt.headless=true -Dalfresco.home=/opt/alfresco4 -Dcom.sun.management.jmxremote -Dcom.sun.management.jmxremote.ssl=false -Dsun.security.ssl.allowUnsafeRenegotiation=true -Djava.net.preferIPv4Stack=true"

After making changes in few parameters, I got below settings which works perfectly fine. I had to increase memory allocation and tune other parameters.

export JAVA_OPTS="-Xms4096m -Xmx8192m -XX:MaxPermSize=512m -XX:NewSize=3072m -XX:+UseConcMarkSweepGC -XX:+UseCodeCacheFlushing -XX:ReservedCodeCacheSize=64m -Djava.awt.headless=true -Dalfresco.home=/opt/alfresco4 -Dcom.sun.management.jmxremote -Dcom.sun.management.jmxremote.ssl=false -Dsun.security.ssl.allowUnsafeRenegotiation=true -Djava.net.preferIPv4Stack=true"

I have taken screenshot from VisualVM.

Heap Memory and CPU Usage:

OldGen and Eden Space usage:


Linux Terminal Shortcuts

Writing long commands every time becomes tedious and time consuming too. Here I am going to list down some shortcuts which will help you to save time while using Linux terminal.

Ctrl+left & Ctrl+right

Hitting Ctrl and the left or right arrow keys jumps between arguments in your command. So, if you had a typo in the middle of the command, you could jump to it quickly with Ctrl and a few taps of the left arrow key.

Tab

This shortcut key is often used. When using bash you need to just type few characters and then pressing tab will auto complete command or file/directory name.

Ctrl + U or Ctrl + C
This shortcut will clear command written on shell.

Ctrl + R
This command also most often used. When you hit Ctrl plus R it will open up history, as you type character it will display all previous command matches with character you typed.

If you want to go through all command one by one which matches with the character you entered then press Ctrl + Shift + R.

Alt + BackSpace

This shortcut will remove the word from its current position.

!
This shortcut also used to repeat previous command. Instead of pressing Ctrl + R, you can type ! then characters to repeat from history.

You can see in below image. If I want to run "pkill skype", I have written "!pk" and the hit enter. This will run "pkill skype" command.


Microsoft SQL Server 2008 Database Mirroring

Scenario:

We have below two server's details. Both servers are in workgroup. Need to setup database mirroring using certificate based authentication. This is going to be Active-Passive mirroring. So at a time only one server(Active) server will serve Database, another DB server(passive) will not be usable as it will be in synchronization stat.

The Active DB server will be called as “Principal” server and Passive DB server will be called as “Mirror” server.

DB Servers:
Active DB IP: 10.36.100.54
Passive DB IP: 10.36.100.53
DB name: liferayprod

Prerequisites
Keep port 5022 open between two Database servers

Database Backup and Restore Procedure
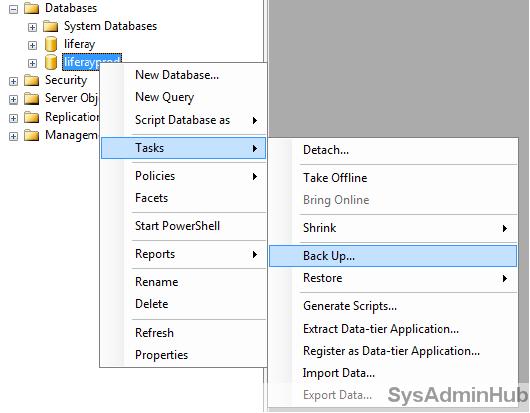
(1) First take Database backup from Principal server. Follow below steps to take database backup.

(2) Select “Backup Type” full and click on Ok button.
(3) Now we need to backup transaction logs.

(4) Now go to location where you have backup database. Copy liferayprod.bak file from that location to Mirror Database.
(5) Now perform below steps on Mirror database to restore database.
(6) Create database, give name “Liferayprod”. Now do right click on that database, click on Task-> Restore → Database.
(7) Now locate database file. Do check mark as shown in figure.
(8) Now click on “Options”. Select below two options as shown in figure. Click on “Ok” button.
(9) Once restore complete, you will see database's status as shown in below figure.

Database Mirroring Queries on Principal and Mirror server

Perform below steps on Principal server:

On Active server open Query browser and fire below queries one by one. Follow the instructions given 


Before running below query create c:\certificate directory in server. If required, need to give full permission to "Everyone".

Before running below query, copy mirror server's certificate from mirror server to principal server's c:\certificate directory. 


Now wait for 10 mins before applying below query. As first time it takes time to synchronization.


Perform below steps in Mirror server:

On Passive server open Query browser and fire below queries one by one. 
Before running below query create c:\certificate directory in server. If required, need to give full permission to "Everyone".


Before running below query, copy  Principal server's certificate from principal server to mirror server's c:\certificate directory. 


Now wait for 10 mins before applying below query. As first time it takes time to synchronization.


Varify Mirroring Status

(1) Once you run queries for mirroring, DB mirroring should be started. On the mirror server you should see below mentioned status.
(2) At the principal server, you should be able to see below mentioned status.
(3) We can check mirroring status as shown in below figure. Right click on Database → Tasks → Launch Database mirroring Monitor.

Manual Failover

If you want to do manual Failover then use below query. Which will make Principal database as Mirror Database and Mirror Database->Principal database.


You will need to do manual Fail over when both databases are not connected with each other. There could be the reason like, database server it self is down or may be blocked port. So in that case you can remove database server's mirroring function. Then database will act like standalone database server. Later on you can configure mirroring once you are able to fix connectivity issue. You can use below command to remove database from mirroring.


To bring the mirror online manually after dropping mirroring, issue the following command (you can’t do it while it is still mirrored).


Note: At the time of reconfiguration, you may need to delete “master key” and endpoint through below query.

→ On Mirror server follow below steps.


→ On principal Server follow below steps.


Installing Apache Ant on linux / CentOS / Red Hat

Prerequisites:
- Make sure you have installed JAVA . If not then click here to install java.

Steps:
1. First download Ant binary packages from Apache. You may use below link to download Apache Ant.
http://apache.mirrors.tds.net//ant/binaries/apache-ant-1.9.2-bin.tar.gz

2. Keep downloaded binary file at some location. For example: /opt/apache-ant-1.9.2-bin.tar.gz.
3. Now go to /opt directory and extract zip file using below command.
cd /opt/
tar -zxvf apache-ant-1.9.2-bin.tar.gz
4. When you extract zip file it will create /opt/apache-ant-1.9.2 folder. Now we need to set ANT_HOME variable.
so open /etc/profile file and at the end of file write below lines and save it.

export ANT_HOME=/opt/apache-ant-1.9.2
export PATH=$PATH:$ANT_HOME/bin

Once you are done with /etc/profile file editing, you need to run below command to set variable's value.

source /etc/profile

5. Once you are done with above command, you can check ANT_HOME variable value with echo command.
for example:

-bash-3.2$ echo $ANT_HOME
/opt/apache-ant-1.9.2

Done.

RAID 5 Configuration on CentOS using mdadm

Why RAID?
RAID stands for Redundant Array of Inexpensive Disks or Redundant Array of Independent Disks. In RAID we join two or more harddisks and make one logical disk. Which gives below mentioned benefits. 

  • Stopping data loss, when one or more disks of the array fail.
  • Getting faster data transfers.
  • Getting the ability to change disks while the system keeps running.
  • Joining several disks to get more storage capacity; sometimes lots of cheap disks are used, rather than a more expensive one.
There are different RAID level, which we can make use of based on our requirement. I am not going into deep on level, but one of the most popular RAID level that is "RAID 5", I am going to show you here through example on CentOS.

Why RAID 5?
RAID 5 uses "striping with distributed parity" algorithm. In which each block on data will be stored in three different places. Ofcourse, RAID 5 needs atleast 3 disks. When any write request comes, it stores block on 2 disks(disk A and disk B) and on third disk(disk C) it will write parity information. On the next write request, it will store block on another 2 disk (disk B and disk C) and on third disk C it will store parity information. Like this, it continues writing parity and data blocks on all three disk. Due to parity information on each disk, we will get lesser storage space as 1/3 space will be used for parity.  
In case if any disk fails, RAID 5 will not stop. It will keep working in "downgraded mode". You will feel slow performance. Once you add another disk into RAID 5 array, it will start building array and after sometime, RAID 5 will act as usual. 

Steps to configure RAID 5 on CentOS
Prerequisites:
Additional 3 disks for RAID 5
mdadm-2.6.9-3.el5 package installed

1. Lets see how many disks are installed using "fdisk -l" command.

fdisk -l
fdisk -l
You can see here /dev/sdb, /dev/sdc and /dev/sdd is unpartitioned. We need to create partition so that it can be used in RAID 5.
2. using "fdisk" command we can create partition. So first we will create partition for /dev/sdb disk. Give command as shown below.
fdisk /dev/sdb
fdisk /dev/sdb
Once you give "fdisk /dev/sdb" command, you need to press "n", then press "p" and then press "1' for partition number. You can check partition using "p".
Print Partition using p
print partition using "p"
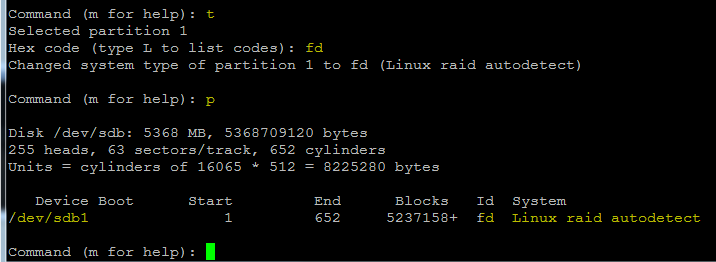
Now we need to change "ID" from "83" to "fd". Please see below image and follow steps. 
Change partition type
Now you can see partition "ID" is changed from "83" to "fd". Now we need to save changes, so press "w" as shown in below image.
save partition using w
Save partition
Now once again you can see partition status using "fdisk -l" command. You will see output as below.
show partition information
fdisk -l
you can see here /dev/sdb partition is created with "ID" as "fd".

3. Follow step #2 for /dev/sdc and /dev/sdd. Once you will create partition for all 3 disks, you will see below output.
Show partition information
4. Now we need to use "mdadm" command to create RAID 5 array. The command it self is self explanatory.
mdadm create partition
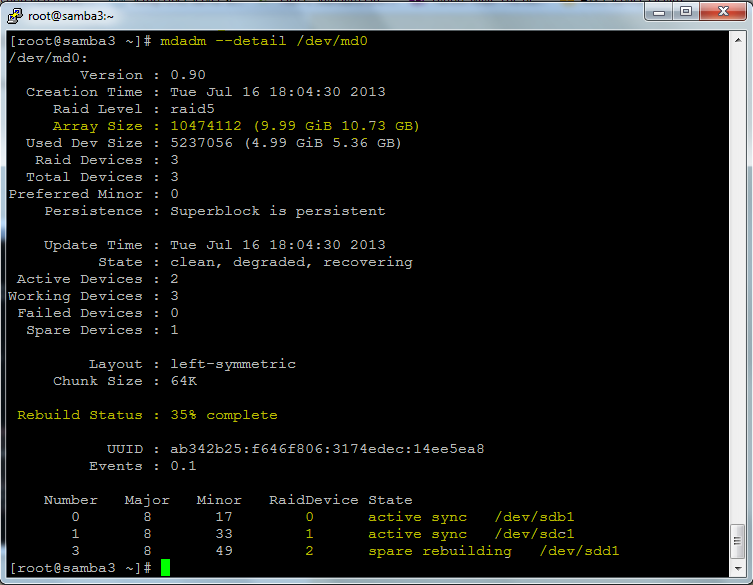
5. Once you create partition using mdadm command, it doesn't create RAID partition instantly, it takes time. you can see status using "mdadm --detail /dev/md0" command as shown below.
mdadm show details
mdadm show details
You can notice here "spare rebuilding" for /dev/sdd1. After some time you will see "active sync" for /dev/sdd1.
mdadm show details
mdadm show details
6. Now we need to format /dev/md0 RAID partition using mkfs.ext3. You can choose the partition type you want. Once format is done, you can mount it in /etc/fstab.

Format Partition
Format Partition
I hope this post will be helpful to configure RAID 5 in your server. 

Alfresco Backup and Restore Process

This post describes backup and restore process of Alfresco. Here I have mentioned steps to backup alfresco's content store(alf_data), lucene index data and Database.

Alfresco Backup process:
There are two methods by which we can do alfresco backup. First one is Hot backup, when alfresco is running and you want to do backup without shutting down alfresco. Second is is Cold backup, when you can shutdown alfresco and do backup. Most of people prefer doing Hot backup, as no one will prefer to shutdown alfresco everytime before doing backup and turn back on when finished. Also hot backup also gives surety of data consistency except latest lucene index. But yes, when you restore backup from hot backup set, Alfresco will rebuild Lucene indexes. So follow below steps for Alfresco backup.

Cold Backup Process:
  1. Stop Alfresco.
  2. Backup the database Alfresco is configured to use, using your database vendor's backup tools.
  3. Backup the Alfresco “dir.root” and “dir.indexes” directory. You can get location of these two paths from alfresco-global.properties file.
  4. Store both the database and Alfresco “dir.root/dir.indexes” backups together as a single unit. For example, store the backups in the same directory or compressed file.
  5. Start Alfresco.
Hot Backup Process:

It is absolutely critical that hot backups are performed in the following order:
  1. Make sure you have a "backup-lucene-indexes" folder under 'dir.root' if not specified separate path. Backup-lucene-indexes can be useful when you want to restore indexes.
  2. Backup the database Alfresco is configured to use, using your database vendor's backup tools.
  3. As soon as the database backup completes, backup specific subdirectories in the Alfresco dir.root.
Sub-directories would be as listed below.
  • contentstore
  • contentstore.deleted
  • audit.contentstore
  • backup-lucene-indexes
Finally, store both the database and Alfresco dir.root backups together as a single unit. For example, store the backups in the same directory or in a single compressed file.
Do not store the database and dir.root backups independently, as that makes it unnecessarily difficult to reconstruct a valid backup set for restoration.


'Note': Alfresco generates "backup-lucene-indexes" everyday at 3:00 am, so make sure that database backup time does not overlap with this schedule. The "backup-lucene-indexes" generation should be finished before you start the SQL backup. So if backup-lucene-indexes is running at 3:00 am then you can set database backup at 4:00 am considering that your alfresco system is not being used during this time.

Restore Process

1. Stop Alfresco.
2. Copy the existing dir.root to a temporary location.
3. Restore dir.root and dir.indexes from backup.
4. If you are restoring from a hot backup, rename <dir.indexes>/backup-lucene-indexes to <dir.root>/lucene-indexes.
5. Restore the database from the database backups.
6. Start Alfresco.

You would see in logs that alfresco is rebuilding indexing. But index rebuilding will be incremental so it wont take time.

Apache Load Balancer Configuration using mod_jk

Why Apache Load Balancer

We can use Apache Load Balancer module (mod_jk) to optimizes resource use, maximizes throughput, minimizes response time, and avoids overload as well as for auto failover.

How it can be utilized

Lets assume that you have two tomcat web applications running on two different servers. Now you want to make your application highly available and also want to distribute traffic across both tomcat application servers. So here we can configure one web server(apache) with mod_jk module, which will be act as a frontend server and two tomcat application servers will act as backend server.

Client request for your application will come to Web server(apache). Based on mod_jk configuration, apache will send request to both tomcat applications. Cool!!!!

How to configure mod_jk on Apache Web server.

1. First download mod_jk source from below mentioned link. Please choose package according to your server architecture(32bit or x64).
For Linux:
http://apache.petsads.us//tomcat/tomcat-connectors/jk/tomcat-connectors-1.2.37-src.tar.gz
For Windows:
http://apache.petsads.us//tomcat/tomcat-connectors/jk/binaries/windows/
2. If you are using windows then you need to simply copy mod_jk.so file into your apache's module directory.
If you are using linux then you will have to make mod_jk.so file using below steps.
1.1 Extract tomcat-connectors-1.2.37-src.tar.gz.
"tar -zxvf tomcat-connectors-1.2.37-src.tar.gz"
1.2 Now configure it using below command.
"./configure --with-apxs=/usr/sbin/apxs"
1.3 Now run make and then make install.
"make && make install"
Note: If you are getting any error, then please check if "httpd-devel" package is installed or not.
1.4 If above 3 commands run successfully, then it would have created mod_jk.so file into /etc/httpd/modules/ directory.

3. Now Load that module in apache's httpd.conf file using below string. You can copy that string at bottom of httpd.conf file.
#
# Load mod_jk
#
LoadModule jk_module modules/mod_jk.so

4. Now you need to specify workers.properties file path in httpd.conf file, so that apache can read configuration of both tomcat applications.

JkWorkersFile conf/workers.properties

5. you can specify log file location, log level, log format too using below string in httpd.conf file.

JkLogFile logs/mod_jk.log
JkLogLevel warn
JkLogStampFormat "[%a %b %d %H:%M:%S %Y]"

6. Now create workers.properties file using below content.

Here
- worker.jvm1.port is ajp port of tomcat application server configured in server.xml file,
- worker.jvm1.host is IP address of tomcat application server,
- worker.jvm1.type is the ajp protocol version,
- worker.jvm1.lbfactor is to assign weight to tomcat application,
- worker.jvm1.max_packet_size is to specify maximum packet size.
Please note that here we have used jvm1 and jvm2. For tomcat server 1, we have used jvm1 and for another tomcat server we have used jvm2.

worker.loadbalancer.balance_workers is used to mention name of tomcat application server's worker name.
worker.loadbalancer.sticky_session - This will enable sticky session.
worker.loadbalancer.method - This will set load balancing method.

7. Now you need to mount Load Balancer in httpd.conf file. You can use below string in httpd.conf file to mount load balancer.

JkMount /* loadbalancer

If you want to exclude any directory then it can be specified before JkMount tag as shown below.

JkUnMount /balancer-manager loadbalancer
JkMount /* loadbalancer

8. Once all above mentioned configuration done, you can restart apache web server and test.

For Sticky Session testing:

If your application works on session, then you may need to configure sticky session at Apache Load Balancer. In workers.properties we have already set worker.loadbalancer.sticky_session to 1. But we need configuration at tomcat too. In both application server edit tomcat/conf/server.xml file and change property as shown below.
Before:
<Engine name="Catalina" defaultHost="localhost" >
After:
<Engine name="Catalina" defaultHost="localhost" jvmRoute="jvm1">
In tomcat app server 1 you can use jvm1 and in second tomcat you can use jvm2. 

Configure Log4j logger with Tomcat 6

By default tomcat uses "java.util.logging" for all internal logging in tomcat. If you want to use log4j with tomcat for logging then follow below steps.
So before we start lets remove tomcat's default java.util.logging configuration and add log4j.

You will have to download log4j jar file from here. Apart from log4j jar file you need to get tomcat-juli.jar and tomcat-juli-adapters.jar files from this location according to your tomcat version.

So after downloading log4j jar, tomcat-juli.jar and tomcat-juli-adapters.jar files follow below steps.
1. Copy tomcat-juli-adapters.jar file into tomcat/lib folder.
2. Create log4j.properties file in tomcat/lib folder with below content.

3. Now copy downloaded tomcat-juli.jar into tomcat/bin directory. You need to replace existing tomcat-juli.jar file.
4. Then remove tomcat/conf/logging.properties file.