Installing Apache Ant on linux / CentOS / Red Hat

Prerequisites:
- Make sure you have installed JAVA . If not then click here to install java.

Steps:
1. First download Ant binary packages from Apache. You may use below link to download Apache Ant.
http://apache.mirrors.tds.net//ant/binaries/apache-ant-1.9.2-bin.tar.gz

2. Keep downloaded binary file at some location. For example: /opt/apache-ant-1.9.2-bin.tar.gz.
3. Now go to /opt directory and extract zip file using below command.
cd /opt/
tar -zxvf apache-ant-1.9.2-bin.tar.gz
4. When you extract zip file it will create /opt/apache-ant-1.9.2 folder. Now we need to set ANT_HOME variable.
so open /etc/profile file and at the end of file write below lines and save it.

export ANT_HOME=/opt/apache-ant-1.9.2
export PATH=$PATH:$ANT_HOME/bin

Once you are done with /etc/profile file editing, you need to run below command to set variable's value.

source /etc/profile

5. Once you are done with above command, you can check ANT_HOME variable value with echo command.
for example:

-bash-3.2$ echo $ANT_HOME
/opt/apache-ant-1.9.2

Done.

RAID 5 Configuration on CentOS using mdadm

Why RAID?
RAID stands for Redundant Array of Inexpensive Disks or Redundant Array of Independent Disks. In RAID we join two or more harddisks and make one logical disk. Which gives below mentioned benefits. 

  • Stopping data loss, when one or more disks of the array fail.
  • Getting faster data transfers.
  • Getting the ability to change disks while the system keeps running.
  • Joining several disks to get more storage capacity; sometimes lots of cheap disks are used, rather than a more expensive one.
There are different RAID level, which we can make use of based on our requirement. I am not going into deep on level, but one of the most popular RAID level that is "RAID 5", I am going to show you here through example on CentOS.

Why RAID 5?
RAID 5 uses "striping with distributed parity" algorithm. In which each block on data will be stored in three different places. Ofcourse, RAID 5 needs atleast 3 disks. When any write request comes, it stores block on 2 disks(disk A and disk B) and on third disk(disk C) it will write parity information. On the next write request, it will store block on another 2 disk (disk B and disk C) and on third disk C it will store parity information. Like this, it continues writing parity and data blocks on all three disk. Due to parity information on each disk, we will get lesser storage space as 1/3 space will be used for parity.  
In case if any disk fails, RAID 5 will not stop. It will keep working in "downgraded mode". You will feel slow performance. Once you add another disk into RAID 5 array, it will start building array and after sometime, RAID 5 will act as usual. 

Steps to configure RAID 5 on CentOS
Prerequisites:
Additional 3 disks for RAID 5
mdadm-2.6.9-3.el5 package installed

1. Lets see how many disks are installed using "fdisk -l" command.

fdisk -l
fdisk -l
You can see here /dev/sdb, /dev/sdc and /dev/sdd is unpartitioned. We need to create partition so that it can be used in RAID 5.
2. using "fdisk" command we can create partition. So first we will create partition for /dev/sdb disk. Give command as shown below.
fdisk /dev/sdb
fdisk /dev/sdb
Once you give "fdisk /dev/sdb" command, you need to press "n", then press "p" and then press "1' for partition number. You can check partition using "p".
Print Partition using p
print partition using "p"
Now we need to change "ID" from "83" to "fd". Please see below image and follow steps. 
Change partition type
Now you can see partition "ID" is changed from "83" to "fd". Now we need to save changes, so press "w" as shown in below image.
save partition using w
Save partition
Now once again you can see partition status using "fdisk -l" command. You will see output as below.
show partition information
fdisk -l
you can see here /dev/sdb partition is created with "ID" as "fd".

3. Follow step #2 for /dev/sdc and /dev/sdd. Once you will create partition for all 3 disks, you will see below output.
Show partition information
4. Now we need to use "mdadm" command to create RAID 5 array. The command it self is self explanatory.
mdadm create partition
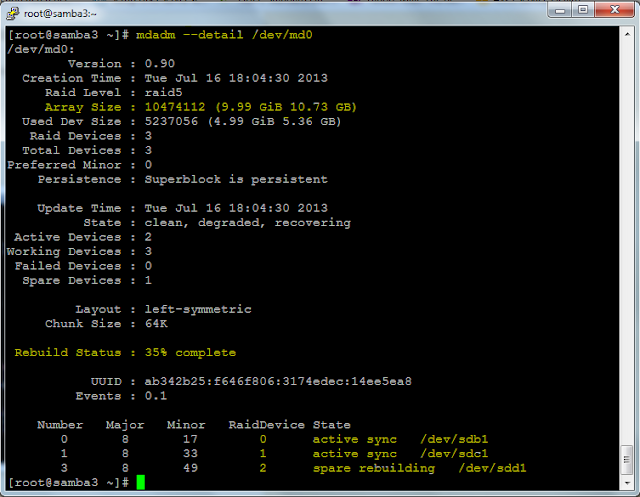
5. Once you create partition using mdadm command, it doesn't create RAID partition instantly, it takes time. you can see status using "mdadm --detail /dev/md0" command as shown below.
mdadm show details
mdadm show details
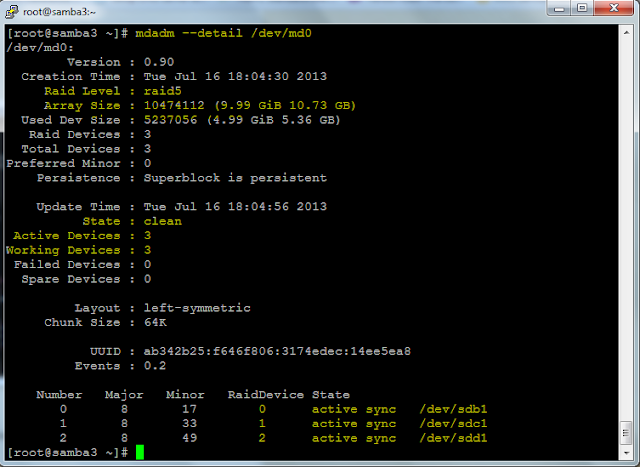
You can notice here "spare rebuilding" for /dev/sdd1. After some time you will see "active sync" for /dev/sdd1.
mdadm show details
mdadm show details
6. Now we need to format /dev/md0 RAID partition using mkfs.ext3. You can choose the partition type you want. Once format is done, you can mount it in /etc/fstab.

Format Partition
Format Partition
I hope this post will be helpful to configure RAID 5 in your server. 

Alfresco Backup and Restore Process

This post describes backup and restore process of Alfresco. Here I have mentioned steps to backup alfresco's content store(alf_data), lucene index data and Database.

Alfresco Backup process:
There are two methods by which we can do alfresco backup. First one is Hot backup, when alfresco is running and you want to do backup without shutting down alfresco. Second is is Cold backup, when you can shutdown alfresco and do backup. Most of people prefer doing Hot backup, as no one will prefer to shutdown alfresco everytime before doing backup and turn back on when finished. Also hot backup also gives surety of data consistency except latest lucene index. But yes, when you restore backup from hot backup set, Alfresco will rebuild Lucene indexes. So follow below steps for Alfresco backup.

Cold Backup Process:
  1. Stop Alfresco.
  2. Backup the database Alfresco is configured to use, using your database vendor's backup tools.
  3. Backup the Alfresco “dir.root” and “dir.indexes” directory. You can get location of these two paths from alfresco-global.properties file.
  4. Store both the database and Alfresco “dir.root/dir.indexes” backups together as a single unit. For example, store the backups in the same directory or compressed file.
  5. Start Alfresco.
Hot Backup Process:

It is absolutely critical that hot backups are performed in the following order:
  1. Make sure you have a "backup-lucene-indexes" folder under 'dir.root' if not specified separate path. Backup-lucene-indexes can be useful when you want to restore indexes.
  2. Backup the database Alfresco is configured to use, using your database vendor's backup tools.
  3. As soon as the database backup completes, backup specific subdirectories in the Alfresco dir.root.
Sub-directories would be as listed below.
  • contentstore
  • contentstore.deleted
  • audit.contentstore
  • backup-lucene-indexes
Finally, store both the database and Alfresco dir.root backups together as a single unit. For example, store the backups in the same directory or in a single compressed file.
Do not store the database and dir.root backups independently, as that makes it unnecessarily difficult to reconstruct a valid backup set for restoration.


'Note': Alfresco generates "backup-lucene-indexes" everyday at 3:00 am, so make sure that database backup time does not overlap with this schedule. The "backup-lucene-indexes" generation should be finished before you start the SQL backup. So if backup-lucene-indexes is running at 3:00 am then you can set database backup at 4:00 am considering that your alfresco system is not being used during this time.

Restore Process

1. Stop Alfresco.
2. Copy the existing dir.root to a temporary location.
3. Restore dir.root and dir.indexes from backup.
4. If you are restoring from a hot backup, rename <dir.indexes>/backup-lucene-indexes to <dir.root>/lucene-indexes.
5. Restore the database from the database backups.
6. Start Alfresco.

You would see in logs that alfresco is rebuilding indexing. But index rebuilding will be incremental so it wont take time.

Apache Load Balancer Configuration using mod_jk

Why Apache Load Balancer

We can use Apache Load Balancer module (mod_jk) to optimizes resource use, maximizes throughput, minimizes response time, and avoids overload as well as for auto failover.

How it can be utilized

Lets assume that you have two tomcat web applications running on two different servers. Now you want to make your application highly available and also want to distribute traffic across both tomcat application servers. So here we can configure one web server(apache) with mod_jk module, which will be act as a frontend server and two tomcat application servers will act as backend server.

Client request for your application will come to Web server(apache). Based on mod_jk configuration, apache will send request to both tomcat applications. Cool!!!!

How to configure mod_jk on Apache Web server.

1. First download mod_jk source from below mentioned link. Please choose package according to your server architecture(32bit or x64).
For Linux:
http://apache.petsads.us//tomcat/tomcat-connectors/jk/tomcat-connectors-1.2.37-src.tar.gz
For Windows:
http://apache.petsads.us//tomcat/tomcat-connectors/jk/binaries/windows/
2. If you are using windows then you need to simply copy mod_jk.so file into your apache's module directory.
If you are using linux then you will have to make mod_jk.so file using below steps.
1.1 Extract tomcat-connectors-1.2.37-src.tar.gz.
"tar -zxvf tomcat-connectors-1.2.37-src.tar.gz"
1.2 Now configure it using below command.
"./configure --with-apxs=/usr/sbin/apxs"
1.3 Now run make and then make install.
"make && make install"
Note: If you are getting any error, then please check if "httpd-devel" package is installed or not.
1.4 If above 3 commands run successfully, then it would have created mod_jk.so file into /etc/httpd/modules/ directory.

3. Now Load that module in apache's httpd.conf file using below string. You can copy that string at bottom of httpd.conf file.
#
# Load mod_jk
#
LoadModule jk_module modules/mod_jk.so

4. Now you need to specify workers.properties file path in httpd.conf file, so that apache can read configuration of both tomcat applications.

JkWorkersFile conf/workers.properties

5. you can specify log file location, log level, log format too using below string in httpd.conf file.

JkLogFile logs/mod_jk.log
JkLogLevel warn
JkLogStampFormat "[%a %b %d %H:%M:%S %Y]"

6. Now create workers.properties file using below content.

Here
- worker.jvm1.port is ajp port of tomcat application server configured in server.xml file,
- worker.jvm1.host is IP address of tomcat application server,
- worker.jvm1.type is the ajp protocol version,
- worker.jvm1.lbfactor is to assign weight to tomcat application,
- worker.jvm1.max_packet_size is to specify maximum packet size.
Please note that here we have used jvm1 and jvm2. For tomcat server 1, we have used jvm1 and for another tomcat server we have used jvm2.

worker.loadbalancer.balance_workers is used to mention name of tomcat application server's worker name.
worker.loadbalancer.sticky_session - This will enable sticky session.
worker.loadbalancer.method - This will set load balancing method.

7. Now you need to mount Load Balancer in httpd.conf file. You can use below string in httpd.conf file to mount load balancer.

JkMount /* loadbalancer

If you want to exclude any directory then it can be specified before JkMount tag as shown below.

JkUnMount /balancer-manager loadbalancer
JkMount /* loadbalancer

8. Once all above mentioned configuration done, you can restart apache web server and test.

For Sticky Session testing:

If your application works on session, then you may need to configure sticky session at Apache Load Balancer. In workers.properties we have already set worker.loadbalancer.sticky_session to 1. But we need configuration at tomcat too. In both application server edit tomcat/conf/server.xml file and change property as shown below.
Before:
<Engine name="Catalina" defaultHost="localhost" >
After:
<Engine name="Catalina" defaultHost="localhost" jvmRoute="jvm1">
In tomcat app server 1 you can use jvm1 and in second tomcat you can use jvm2.